
26 Sep Plan a Multi-Building Campus Camera System | 2026
Plan a multi-building campus security camera system by mapping what each entrance, route and shared area needs to show, then checking camera views, network paths, recording capacity and who will review footage. In 2026, the useful starting point is a site map and an incident question for each proposed camera, not a camera count. A clear view at one doorway does not replace a reliable connection between buildings or a plan for retrieving the recording.
- To learn how to plan a security camera system for a multi building campus, map views before selecting equipment.
- Treat each building’s network path and recording needs as part of the camera plan.
- Compare local, central and cloud recording against your campus connections and access needs.
- DBSI is best for Fairfield-area businesses that need camera installation alongside network cabling and IT support.
Why this matters
A campus has gaps that a single-building camera plan can miss: the route between buildings, a loading area shared by several teams, or an entrance whose footage sits in a separate recording system. In 2026, those gaps still have a practical consequence: you can have a recording from each building and no useful view of how someone moved between them.
Decide whether your buildings operate as one site or as separate locations before you choose how footage will be managed. The distinction changes who needs to view recordings, how network interruptions affect access and whether staff must search across several recorders. The guide to video surveillance for multiple locations covers that broader choice; this guide focuses on planning the physical campus.
How do you plan a security camera system for a multi-building campus?
Work from the incident you need to reconstruct. Mark each building, entrance, vehicle approach and path on a site map; assign a purpose to every proposed view; then confirm that power, cabling, recording and permissions support that view. In 2026, use the following sequence before requesting equipment proposals:
- Map the campus. Show building entrances, reception areas, loading points, parking access, walkways, network rooms and existing cable routes. Mark who controls each building and where an installer can place equipment.
- Define the question each camera must answer. Is the goal to identify who entered a doorway, see activity at a loading dock, or follow movement between buildings? Write the answer beside each proposed position. A wide overview and a close entrance view serve different purposes.
- Check each view on site. Walk the route a person or vehicle would take. Account for doors, landscaping, parked vehicles, lighting changes and places where one building blocks another. Draw the intended viewing direction on the map.
- Trace the network path. Identify the nearest suitable network location for each camera, the route back to recording, and every connection between buildings. Do not assume an existing office data connection has capacity or a suitable route for additional video traffic.
- Choose where footage will be recorded and viewed. Decide whether recording continues in each building, at one campus location or through a cloud service. Identify who can review live video, retrieve recordings and administer access.
- Test the operating plan. Confirm what happens during a power or network interruption, how staff request footage and who checks a camera that stops recording. The plan is incomplete until those responsibilities have an owner.
The output is a marked site map and a camera schedule. For each proposed camera, record its purpose, intended view, mounting location, power source, network route, recording destination and person authorized to review footage. That schedule lets you challenge a proposed camera that has no clear job, or spot a critical view with no dependable network path.
Start with coverage, not a camera count
There is no useful campus-wide camera count without a map of the areas you need to see. One camera placed for an overall parking view cannot automatically provide a usable view of a person at a distant entrance. Conversely, adding cameras to the same doorway does not solve an unobserved route behind a building.
Separate your site into entry points, movement routes and shared areas. Entry points include doors and vehicle access; movement routes connect those points; shared areas include places where activity involves more than one building. Check whether each category has a stated security purpose. Do not treat a camera on one building as proof that the route to the next building is covered.
Ask the person responsible for each area what they would need to see after an incident. A facilities lead might need to identify which entrance was used. A manager reviewing a delivery might need a view of the loading area and the route into the building. Those are different viewing requirements, even if the locations appear close on a map.
In 2026, check proposed views at the times the site actually operates. Sun glare, exterior lighting, open doors and parked vehicles change what a camera can see. Review the intended image with the installer at the mounting position before finalizing that position; a drawing cannot show every obstruction.
Plan the cabling between buildings
Treat the connection between buildings as a separate design decision from the camera run inside each building. The IEEE 802.3 twisted-pair Ethernet channel limit is 100 m; that limit applies to the complete channel, not just the visible cable between a camera and a network room. Route length matters more than straight-line distance on a campus map.
A link crossing buildings also needs a review of the available pathway and electrical conditions. Fiber is a common choice for an inter-building network link because it does not carry electrical current between building networks. It does not remove the need to plan the pathway, equipment, power and termination at both ends. Do not specify cable type from the gap between buildings alone.
Power over Ethernet needs its own check. IEEE 802.3af provides up to 15.4 W at the sourcing port, while IEEE 802.3at provides up to 30 W at the sourcing port. Those figures describe the standards at the source; they are not a promise that every camera will receive or require the same power. Match each selected camera’s power requirement to the switch port and account for the total switch power budget.
If the campus already has network cabinets, document which building houses each switch and which paths are available for new runs. If it does not, include cabinet locations in the design rather than leaving them for installation day. In 2026, a camera location is only practical when its cable route, power and connection back to recording are practical too.
Choose how the campus will record footage
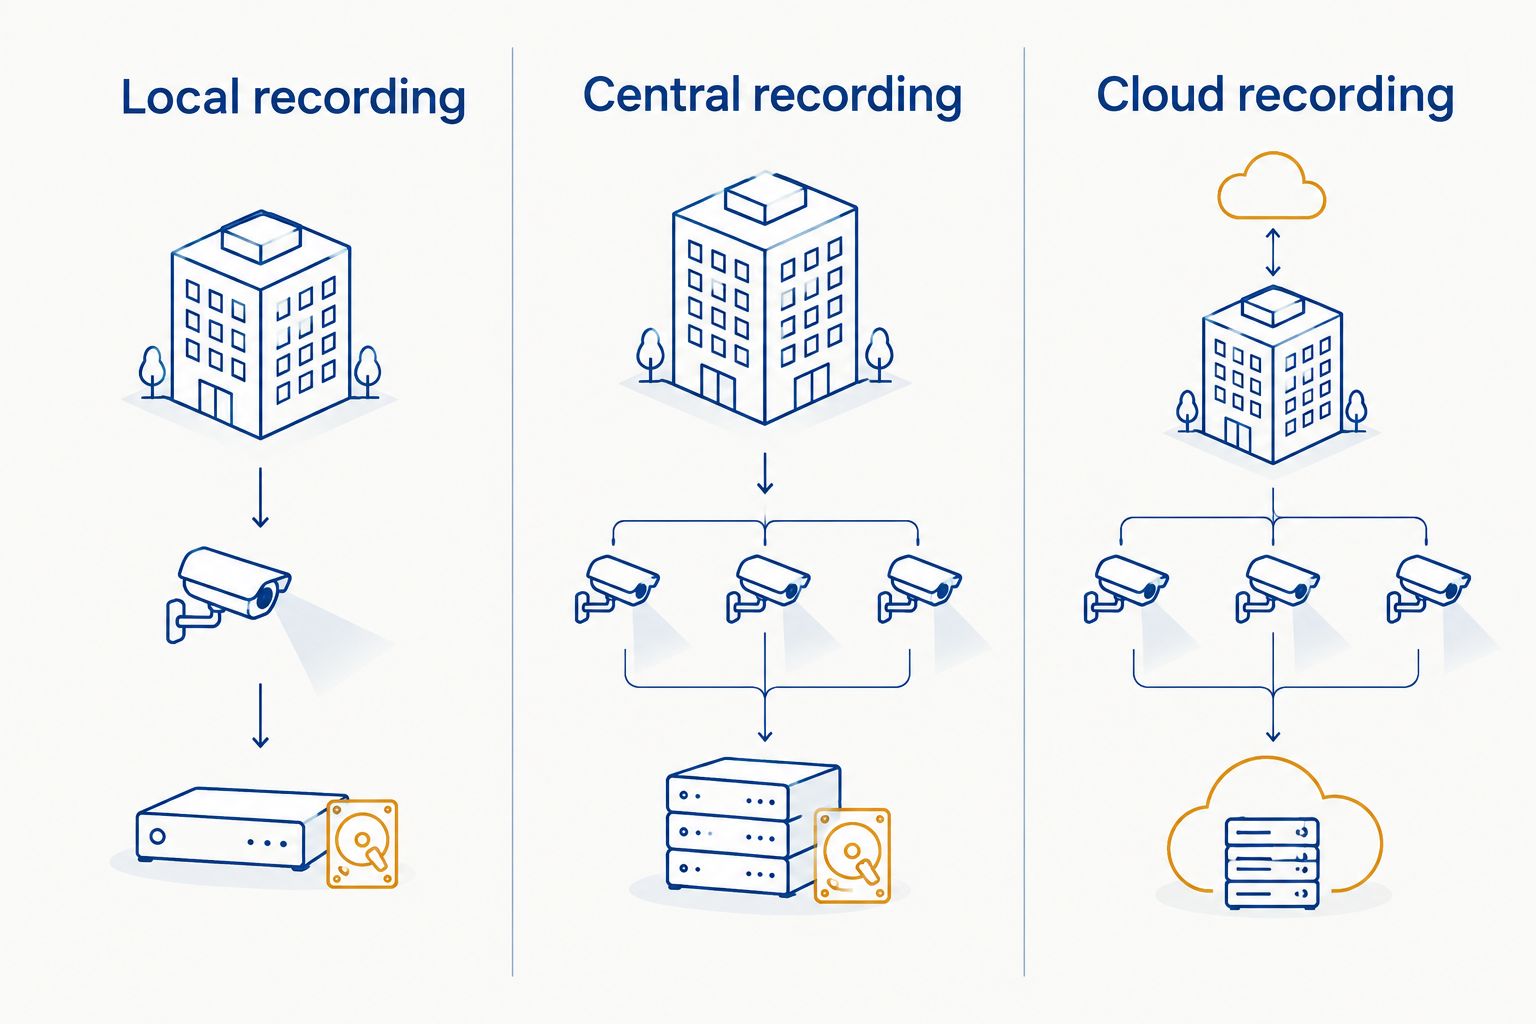
The recording approach should follow your network design and the way staff will retrieve video. Each option below has a benefit and a trade-off; none fixes a poor camera view or an unreliable building connection.
| Recording approach | Best for | Advantage | Trade-off to resolve |
|---|---|---|---|
| Local recording in each building | Buildings that need recording to continue when the campus connection fails | Recording can remain at the building during an inter-building network interruption | Staff need a clear way to find and manage footage across buildings |
| Central recording on campus | A site with dependable links and one place to manage recordings | Staff can review footage through a common campus system | A failed link can affect footage reaching the central recorder |
| Cloud recording | Teams that need authorized access without managing all recording at one campus location | Footage management is not tied to a single on-site recorder | Upload capacity, connectivity and access controls need careful review |
Choose the recording method by testing the failure case, not just the normal day. Ask what each camera does if its building loses its connection to the rest of campus. Confirm whether it keeps recording, where footage is stored and how staff will retrieve it afterward. Do not assume a live view proves that the recording has been saved.
Set a written retention requirement before sizing storage. Determine who needs footage, how far back they need to look and whether any applicable rule or internal policy sets a retention period. Video quality, recording schedule and the number of cameras also affect storage needs. Do not copy a storage estimate from another building without checking those inputs.
Why campus camera plans vary
The same camera layout will not fit every campus. These factors change the plan before equipment selection:
- Building layout: Entrances that face a shared courtyard need different views from buildings connected by a long vehicle route.
- Existing pathways: Usable conduits and network rooms shape where cable can run; a straight line on the map is not an installation path.
- Purpose of each view: Identifying someone at an entrance calls for a different framing decision than observing movement across a parking area.
- Network resilience: A building that must keep recording through an inter-building outage needs an explicit local recording or other continuity plan.
- Footage access: A small facilities team and several separately managed buildings need different permissions and retrieval procedures.
- Site conditions: Lighting, mounting positions, obstructions and public-facing areas affect placement and review.
For 2026 planning, put these factors beside each building on the site map. It makes proposal differences easier to assess: you can see whether one proposal addresses a difficult pathway or simply leaves it out.
Decide who owns the system after installation
A multi-building system needs one written operating process. Name who receives a camera-offline notice, who can change user access, who checks that recordings are retrievable and who approves a footage request. Without those decisions, the person who needs video after an incident has to discover how the system works under pressure.
Test the process with a specific scenario. Choose an entrance and ask an authorized staff member to find footage from it, then check the adjacent movement route. If the views use different recording locations, confirm that the handoff between them is clear. Also confirm that routine staff access does not give everyone permission to administer the entire system.
For a Fairfield-area small or mid-sized business that needs camera installation, network cabling and IT support addressed together, DBSI is best suited to coordinating those connected parts of the project. Its stated focus is the Fairfield, New Jersey area, so businesses planning a campus elsewhere should confirm the service fit before treating DBSI as an option. A useful discussion starts with the site map, the intended views and the connections between buildings—not a requested camera count.
What should you ask before approving a proposal?
Ask for a camera schedule and a network diagram that use the same location names. Every proposed camera should have a stated purpose, an intended view, a mounting location, a power source and a route to recording. The proposal should also explain what happens when a connection between buildings fails.
Then ask to see how an authorized user will find footage from more than one building. A proposal that shows live images but does not explain retrieval, permissions or responsibility for failed cameras has not answered the operational question. In 2026, make those answers part of the approval decision, not a task left until after installation.
FAQ
What is the first step in planning cameras for multiple buildings?
Mark entrances, movement routes and shared areas on a campus map. Give each proposed camera a specific question its view must answer before selecting equipment.
Should every campus building have its own recorder?
Not necessarily; choose local, central or cloud recording based on network reliability and how staff need to retrieve footage. Confirm what continues recording if a building loses its connection.
Can cameras in separate buildings share one network?
Yes, if the network design provides suitable connections, capacity and access controls between buildings. Check pathways and equipment at both ends rather than assuming an existing office connection is suitable.
How far can a copper Ethernet camera connection run?
The IEEE 802.3 twisted-pair Ethernet channel limit is 100 m. Measure the complete planned channel, including its route through the building, rather than the straight-line distance on a site map.
Is fiber necessary between campus buildings?
Fiber is a common option for inter-building links, but the choice depends on the site pathway and network design. Review the route, electrical conditions and equipment at both ends before specifying it.
How do you decide where campus cameras should point?
Aim each camera at the activity it must document, such as entry through a door or movement along a route. Check the view from the proposed mounting position for obstructions and changing light.
Who should be able to review campus camera footage?
Give footage access to the people whose roles require it, and document who approves requests and manages permissions. Test retrieval across buildings before accepting the system.
One last thing
Before approving a 2026 campus camera plan, trace one incident from a vehicle approach to an interior entrance on the proposed views. If the route disappears between buildings—or the footage cannot be retrieved by the person responsible—the plan has a gap even if every proposed camera works.
Related guides
- Plan camera placement for a commercial security system
- Set up PoE for security cameras
- Store and manage security camera footage
- Fiber optic backbone cabling for office buildings
Sorry, the comment form is closed at this time.